
Blog
Powerbuilding: how to train for strength and size at once
Published August 22, 2026 · updated September 25, 2026 · 13 min read
Most lifters are quietly told to pick a side. Chase a bigger squat and bench, or chase a bigger chest and back, as if the two goals fight each other. For an intermediate lifter who wants to be visibly muscular and actually strong, that choice always felt wrong, and it mostly is. Powerbuilding is the training style that stops pretending you have to choose.
The idea is simple. Anchor each session with heavy, low-rep work on the big compound lifts, then spend the rest of the session on higher-rep accessory volume that drives muscle growth. You get the strength adaptations from the heavy sets and the size adaptations from the volume, in the same week, on the same body.
What most articles skip is the part that decides whether a powerbuilding block works: how hard you push each half, and how you track it. The strength anchor and the hypertrophy accessories want different effort targets, different progression, and honest per-set records. That is where reps in reserve and a fast logbook do the heavy lifting, and it is where RIRLift is built to help. More on that once the structure is clear.
What is powerbuilding?
Powerbuilding, which you will also see written as two words (power building), is a hybrid training method that combines powerlifting and bodybuilding in one program. You train the main barbell lifts (squat, bench press, deadlift, and often the overhead press) for maximal strength in low rep ranges, then add bodybuilding-style accessory and isolation work in moderate to high rep ranges to maximize muscle size. The goal is to be strong and muscular at the same time, rather than specializing in only one.
That definition matters because it sets the whole structure. Powerbuilding is not "lift heavy sometimes." It is a deliberate split of every session, and often every week, into a strength job and a size job that are programmed and progressed on their own terms.
Powerbuilding vs powerlifting vs bodybuilding
The three styles overlap in the gym but aim at different targets. Powerlifting optimizes a one-rep max on three lifts. Bodybuilding optimizes muscle size and symmetry. Powerbuilding refuses to fully commit to either and takes the trainable middle.
| Powerlifting | Powerbuilding | Bodybuilding | |
|---|---|---|---|
| Primary goal | Max strength on squat, bench, deadlift | Strength and size together | Muscle size and symmetry |
| Main rep ranges | 1 to 5 reps | 3 to 6 on compounds, 8 to 20 on accessories | 6 to 20+ reps |
| Load emphasis | Very heavy (80 to 95%+ of 1RM) | Heavy anchor plus moderate volume | Moderate, high total volume |
| How progress is judged | Competition total | Both lifts going up and muscle being added | Muscle measurements, physique |
| Best fit | Strength-sport athletes | Lifters who want both | Physique-focused lifters |
The tradeoff is real and worth stating plainly. Because powerbuilding pursues two goals, it advances each a little slower than a program that chases only one, and it costs more recovery than either specialized style. For most people who train to look strong and be strong, that is an easy trade. For a lifter peaking for a meet or a stage in the next eight weeks, it is not the right block.
If you want the deeper version of this comparison, our post on hypertrophy versus strength training breaks down how the adaptations actually differ and where they overlap.
How a powerbuilding session is structured
A powerbuilding workout is built in three layers, in this order:
- Heavy compound anchor. Open with one primary barbell lift in a low rep range, roughly 3 to 6 reps at 80 to 90% of your max. This is your strength driver, done while you are fresh. Full rest between sets, because the point is quality and load, not fatigue.
- Secondary compound volume. Follow with a related compound or a close variation for moderate reps, around 6 to 10. This bridges the two goals: still heavy enough to add strength, high enough in volume to build muscle.
- Bodybuilding accessories. Finish with isolation and machine work for 10 to 20 or more reps, targeting the muscles you want to grow and the ones the compounds miss. This is where most of your weekly hypertrophy volume comes from.
Order is not optional. The heavy anchor goes first because low-rep strength work is the most sensitive to fatigue, and burying it behind accessory work turns a strength session into a tired one. Put the highest-priority, most fatiguing work where you can still do it well.
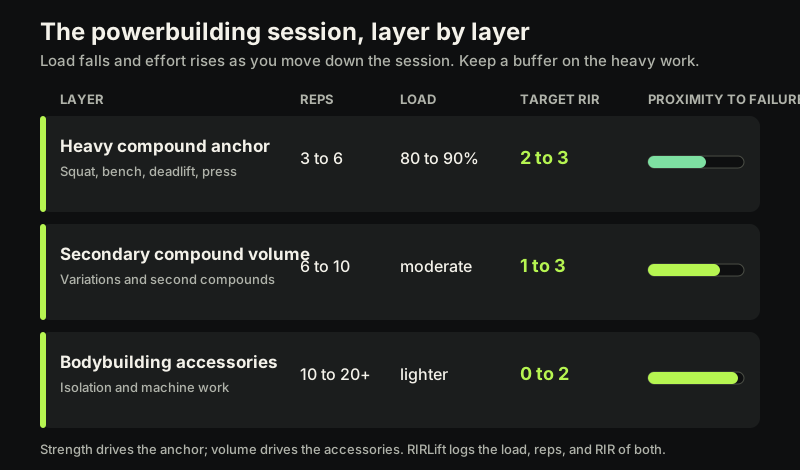
Powerbuilding rep ranges: where effort and RIR change between the two halves
Here is the part almost every powerbuilding guide leaves out. The two halves of the session do not just use different rep ranges. They should use different levels of effort, and reps in reserve is the cleanest way to manage that difference.
Reps in reserve (RIR) counts how many clean reps you had left when you racked the bar. A set at 2 RIR means you believe you could have done two more good reps. On the heavy strength anchor, you want a real buffer, because grinding a top single or double to failure spikes fatigue and injury risk without adding much stimulus. On the accessories, a smaller buffer is usually better, because muscle growth is driven by hard sets taken reasonably close to failure.
| Session layer | Rep range | Load | Target RIR | Why |
|---|---|---|---|---|
| Heavy compound anchor | 3 to 6 | 80 to 90% 1RM | 2 to 3 RIR | Preserve technique and recovery; strength does not need failure |
| Secondary compound volume | 6 to 10 | Moderate to heavy | 1 to 3 RIR | Balance stimulus and fatigue on a taxing movement |
| Bodybuilding accessories | 10 to 20+ | Lighter, higher volume | 0 to 2 RIR | Growth rewards sets pushed close to failure |
This split is well supported. Strength and size can both be built across a wide range of loads when sets are taken close enough to failure, but heavier loads have the edge for maximal strength while moderate loads and higher volume are efficient for size, which is exactly why powerbuilding uses both (Schoenfeld et al., systematic review and meta-analysis). And how close to failure you actually train is one of the biggest levers you control, which is the whole case for logging RIR rather than guessing it (Stronger by Science on autoregulation).
The practical trap is honesty. Lifters routinely call a set 1 RIR that was closer to 3 or 4. If your accessories are drifting further from failure than you think, your size work is quietly underpowered. If your heavy singles keep sliding to true failure, your recovery is quietly overdrawn. You cannot fix what you do not record. Our take on when to push all the way, in should you train to failure, goes deeper on where the line sits.
How to progress each half
Because the two halves have different jobs, they progress differently.
On the heavy anchor, progress load first. Add a small amount of weight when you hit the top of your rep range at your target RIR, keep the buffer, and let the bar speed and the RIR tell you when to back off. This is slow, steady strength work, not weekly max attempts.
On the accessories, use double progression. Pick a rep range, add reps within it week to week until you reach the top of the range on all sets, then add weight and drop back to the bottom of the range. It is the most reliable way to add volume without ego-lifting, and we cover it step by step in the double progression method and the broader progressive overload guide.
Across the whole block, watch two signals together: are your main lifts trending up, and is your weekly hard-set volume by muscle where it needs to be for growth? Powerbuilding fails most often not because the plan is wrong but because accessory volume creeps down as the heavy work gets tiring, and nobody notices until a month has passed.
Powerbuilding splits
Powerbuilding does not require a special split. It rides on the same structures you already know, with a heavy compound leading each session.
- Upper/lower (4 days). The most common powerbuilding frame. Two upper and two lower sessions, each opening with a heavy pressing, pulling, squatting, or hinging lift, then accessories. See our upper/lower split breakdown for how to divide the days.
- Push/pull/legs hybrid. Works well at 5 to 6 days a week for lifters who recover well and want more accessory volume per muscle.
- PHUL (power hypertrophy upper lower). A named powerbuilding template with two dedicated power days and two hypertrophy days. It is the cleanest ready-made version of this idea, and we lay it out in the PHUL workout guide.
Pick the split by how many days you can genuinely recover from, not by how many the strongest lifter you follow runs. The heavy anchors raise the recovery cost of every session, so more days is not automatically more progress.
A sample 4-day powerbuilding program
Here is what the whole idea looks like as a runnable week: a 4-day upper/lower split, the most common powerbuilding frame. Every session opens with one heavy compound anchor at 3 to 6 reps and a 2 to 3 RIR buffer, moves to a secondary compound for moderate reps, then finishes with accessories pushed closer to failure. Load falls and effort rises as you go down each day, exactly as the RIR table above lays out.
Day 1 - Upper (bench anchor)
- Barbell bench press: 4 x 3 to 5, 2 to 3 RIR (heavy anchor)
- Weighted pull-up: 3 x 6 to 8, 1 to 2 RIR (secondary compound)
- Incline dumbbell press: 3 x 8 to 12, 1 to 2 RIR
- Chest-supported row: 3 x 10 to 12, 1 to 2 RIR
- Lateral raise: 3 x 12 to 20, 0 to 1 RIR
- Triceps pushdown: 3 x 12 to 15, 0 to 1 RIR
Day 2 - Lower (squat anchor)
- Back squat: 4 x 3 to 5, 2 to 3 RIR (heavy anchor)
- Romanian deadlift: 3 x 6 to 10, 1 to 3 RIR (secondary compound)
- Leg press: 3 x 10 to 15, 1 to 2 RIR
- Seated leg curl: 3 x 10 to 15, 0 to 2 RIR
- Standing calf raise: 4 x 10 to 15, 0 to 1 RIR
Day 3 - Upper (overhead press anchor)
- Overhead press: 4 x 4 to 6, 2 to 3 RIR (heavy anchor)
- Barbell row: 3 x 6 to 10, 1 to 3 RIR (secondary compound)
- Dip or flat dumbbell press: 3 x 8 to 12, 1 to 2 RIR
- Lat pulldown: 3 x 10 to 12, 1 to 2 RIR
- Cable fly: 3 x 12 to 15, 0 to 1 RIR
- Biceps curl: 3 x 12 to 15, 0 to 1 RIR
Day 4 - Lower (deadlift anchor)
- Deadlift: 4 x 3 to 5, 2 to 3 RIR (heavy anchor)
- Front squat or hack squat: 3 x 6 to 10, 1 to 3 RIR (secondary compound)
- Bulgarian split squat: 3 x 8 to 12, 1 to 2 RIR
- Leg extension: 3 x 12 to 15, 0 to 2 RIR
- Seated calf raise: 4 x 12 to 15, 0 to 1 RIR
Two things make this a powerbuilding week rather than a generic upper/lower one. The four anchors (bench, squat, overhead press, deadlift) are the lifts you progress for strength, kept off failure so they stay repeatable. Everything under them is your hypertrophy volume, and most of your weekly hard sets per muscle live there, which is why the accessory blocks are the part you protect when a session runs long. Run the numbers and each major muscle lands in the 10 to 20 hard-set range that drives growth, so if you start dropping accessory sets to save time, that is your size work leaving first.
Progress it exactly as the previous section described: add load on the anchors when you hit the top of the rep range at target RIR, and use double progression on the accessories. The routine is a starting template, not a prescription; swap any exercise for one that fits your equipment and joints, keeping the same rep range and RIR target so the strength-versus-size logic of each slot stays intact.
Who powerbuilding is for, and who should wait
Powerbuilding fits intermediate and advanced lifters who already train with a plan, know their working loads, and want both strength and size without switching goals every few months. If you are past the beginner stage where almost anything works, and you are tired of choosing between looking strong and being strong, this is a natural home.
It is a poor fit in two cases. If you are peaking for a powerlifting meet or a physique show in the next couple of months, specialize instead. And if you are a true beginner, you do not need the added complexity yet; a simpler full-body or upper/lower routine with steady progression will build both strength and size on its own for a while.
Logging a powerbuilding block
Powerbuilding asks you to manage two moving targets at once: load on the strength lifts and volume with honest effort on the accessories. That is a lot to hold in your head between sets, and it is exactly the kind of tracking a paper log or a Notes app does badly.
This is where RIRLift fits. You build the routine on iPhone, setting a rep range and a target RIR per exercise, so the heavy anchor can sit at 3 RIR while the accessories sit at 1 RIR, on purpose. Then you run the session from your Apple Watch, logging actual load, reps, and RIR for every set as you train, phone left in your bag. Values pre-fill from last time, so confirming a set is a tap or a turn of the Digital Crown.
Two things make it a genuine fit for this style of training. First, RIR is a first-class logged value, not an afterthought, so you can see whether your accessories are really getting close to failure and whether your heavy work is holding its buffer. Second, RIRLift puts the week's hard sets per muscle on a muscle map, so the accessory volume that quietly decays under heavy training is visible instead of invisible. If a rack is taken, you can swap an exercise mid-session and keep your target sets, rep range, and RIR, so a busy gym does not derail the plan or the data. If you are new to setting effort targets, start with our reps in reserve guide.
The bottom line
Powerbuilding is the answer to a false choice. You do not have to pick between strength and size; you have to structure a session so each gets its own space, and then progress and track them separately. Heavy compounds first with a real RIR buffer, higher-rep accessories after, pushed closer to failure, and an honest weekly record of both.
Get the structure right and the tracking honest, and you build a body that is as strong as it looks. If you want the fastest way to run and record a powerbuilding block, see how RIRLift works on your wrist or find it on the App Store.